Photography Lesson via Brooklyn, NY
/I write to you from New York, it is winter and I am a Floridian. I'm doing well. There is snow on the ground, although from a distance it looks like sand.
I brought my Canon 5d Markiii and several lenses to choose from. The lens that is on it is the 50mm f1.8 and it has not come off my camera since I first arrived. It is a versatile piece of glass, lightweight, unobtrusive, and works great for portraits, creative compositions, and street photography. The lens is aka "nifty fifty". It's a classic, and I am using it to photograph the streets of Park Slope on my way to Prospect Park.

These streets are picturesque as all get out, and it's early so the sun is rising and working in my favor creating light flares and making everything look quite warm. I'm into it.

Everywhere in Park Slope I see indications of Roman and Greek influence. It certainly isn't exclusive to this part of NY, I see it available in all different aspects of architecture. I amuse myself by identifying the different orders of columns. There are only three: Doric, Ionic and Corinthian. I learned this in an Greek Art History class I took in college while studying photography at the University of Florida.

Speaking of threes. Photography has three elements that determine how light comes in. ISO, F stop, and shutter speed. Let's take a look at how a photograph appears differently based on changing one or more of these principles.
I'm shooting in manual mode, iso 160 and adjusting according to how I want the depth of focus and ambient light to appear. I do this by changing the F stop and shutter speed.
I came across this black wrought iron fence, and decided to use it as a great opportunity to show how changing your focus, but keeping your settings the same can really impact how your final photo appears.
Take a look at the following three images. They were all taken using the same settings, only altering what the camera focuses on. Look at how that really changes each image!
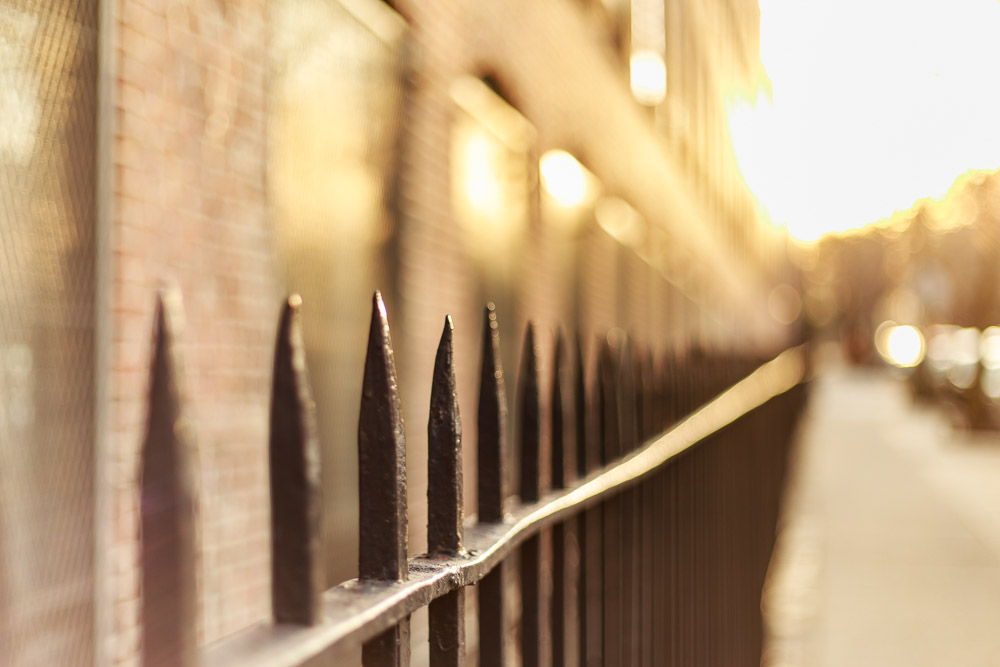
iso 160 F1.8 1/250sec Focused on one of the fence points closest to the camera

iso 160 F1.8 1/250sec Same Settings here and location, but the focus is on the building and further away from the camera

iso 160 F1.8 1/250sec The settings haven't changed here, just what the camera is focused on, which is the fence a bit further out
What happens when you change the F stop? The next 3 are of the same scene, but using a different f stop (the last one show what happens when you slightly change the vantage point of where you stand). Let's take a look at how that affects things:

iso 160 F4 1/125sec
Because we changed the F stop (which is one of the three ways you let light in the camera), We also have to adjust the shutter speed and/or ISO (the other two ways light comes in). I chose to keep the ISO the same and change the F stop and shutter speed to control the depth of field and ambient light. Notice in comparison to the previous images how F1.8 is different from f4.

iso 160 F4 1/125sec Same settings as before, yet focusing on the building instead of the fence points
Ok people, so try this for yourself! Grab your camera and choose to shoot the same scene, alter a few settings. In fact, why not alter your vantage point as well? shoot at eye level, crouch down, crouch forward or back. Do your thing, but shoot the same scene so that later when you upload your photos, you are able to see how making little tweaks here and there tremendously changes the outcome.

iso 160 F4 1/125sec
So this is virtually the same image as the first one I showed, except I crouched down a bit to give a slightly different perspective.
It is a really simple exercise, and it is a interesting way to see how the camera sees. This is all in the name of fun. Practicing photography gives you the opportunity for play, and when it is time to shoot "for real" you've got a variety of experience and an arsenal of ideas to pull from.